Ambient light on rear view mirror
 11-30-2008, 01:18 PM
#1
Out Of Control!!
Thread Starter
Join Date: Nov 2005
Location: OC
Posts: 18,677
Likes: 0
Received 9 Likes
on
9 Posts
a quarter mile at a time
Ambient light on rear view mirror
As some of you have noticed, there's a tiny light on the bottom of the 2005+ cars that shines an amber light down on the cabin to provide a little bit of ambient lighting. Well, this weekend mine blew out. I'll give you one guess as to what happened next. 
So, as soon as I found out it was blown, I proceeded to take things apart. Here's what I learned:
1. The amber light is not LED. It's a tiny little incandescant bulb with a orange "condom" on it.
2. It's soldered in there.
3. The wiring for this light is a GREAT place to tap into for a 12v source - radar detectors. The light stays on as soon as they key is in the 1 position.
4. A 5mm resistor with the flange shaved down (essentially 4mm) fits perfectly as a replacement
5. To use an LED, you will need a resistor. I used a 5mm "yellow" (amber) LED from Fry's electronics. It throws 8000 mcd at 25 degrees. I used a 1/2w 560ohm resistor.
I was totally going mad scientist because I was pissed something wasn't working on my car so I didn't get any pics. There's a good chance I might need to take it all apart again and if I do, I'll do a full DIY.
PS. Here's a pic of the bulb, and condom.
Last edited by e1000; 11-30-2008 at 01:31 PM.


The following users liked this post:
Martiis3 (06-03-2020)
11-30-2008, 03:20 PM
#4
Super Moderator

As some of you have noticed, there's a tiny light on the bottom of the 2005+ cars that shines an amber light down on the cabin to provide a little bit of ambient lighting. Well, this weekend mine blew out. I'll give you one guess as to what happened next.
So, as soon as I found out it was blown, I proceeded to take things apart. Here's what I learned:
1. The amber light is not LED. It's a tiny little incandescant bulb with a orange "condom" on it.
2. It's soldered in there.
3. The wiring for this light is a GREAT place to tap into for a 12v source - radar detectors. The light stays on as soon as they key is in the 1 position.
4. A 5mm resistor with the flange shaved down (essentially 4mm) fits perfectly as a replacement
5. To use an LED, you will need a resistor. I used a 5mm "yellow" (amber) LED from Fry's electronics. It throws 8000 mcd at 25 degrees. I used a 1/2w 560ohm resistor.
I was totally going mad scientist because I was pissed something wasn't working on my car so I didn't get any pics. There's a good chance I might need to take it all apart again and if I do, I'll do a full DIY.
PS. Here's a pic of the bulb, and condom.
11-30-2008, 04:36 PM
#6
Out Of Control!!
Thread Starter
Join Date: Nov 2005
Location: OC
Posts: 18,677
Likes: 0
Received 9 Likes
on
9 Posts
a quarter mile at a time
Here's the DIY.
What you will need:
1x medium to large flathead screwdriver
1x soldering iron and paraphernalia
1x 5mm amber LED
1x 1/2w 560ohm resistor (may be different depending on your LED)
1x loose 22 guage wire
*** All of the GREEN wire in this DIY has been added by me. You will not see any GREEN wire in your mirror. ***
Remove the front light/sunroof pod.
Pry the large light cover off by using a screwdriver towards the front of the cover near the mirror. You'll find a little notch there.

Once the cover is off, you'll see two white plastic tabs. Push them towards the mirror and pull down at the same time. The whole pod should pop out from the headliner. I used a screwdriver to pry while pushing on the tabs.

The back of the pod should have a few wiring harnesses plugged into it. You're looking for the small square white block in the corner. Disconnect it. ** This plug is important. It supplies the power to the bulb we're changing and the homelink circuit. You need to plug this back in if you want to test poliarity and your work.

There is a second wiring harness comming out from the mirror. Unplug this one too. The plug itself is tucked into the headliner and covered with foam padding.

Remove the mirror. Take a flat head screw driver and put it into the small opening at the base of the mirror. Hold the mirror with one hand and then pry downwards. It's held in there by very stiff spring clip so don't be shy.

** I've saved myself the trouble, but your mirror should now be in your hands. Go have a beer.
Ok, now insert a flathead screwdriver into the hole where the base meets the body of the mirror. I don't have a pic for this, but you can easily see what i'm talking about. Pry off the front bezel of the mirror. Work your way around the plastic and be carefull not to damage the plastic bezel.
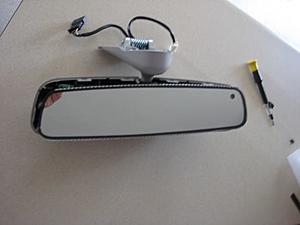
Watch out, the guts of the mirror will fall out. There are 6 little rubber stoppers that fall out, the homelink box, and the mirror will all come loose.
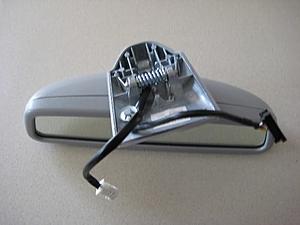
Unplug the wiring harness from the back of the mirror and circuit board.

Use the flathead screwdriver to open the cover to the bulb. It locks on the right hand side.

Once you have the bulb out. Clip it off. There are 2 black wires going to the light. Since it's incandescant, they didn't bother to label them different colors. Wire up your LED and resistor in series. Remeber to test polarity of the LED. To test, go back and plug in the square white plug into the light/sunroof pod. Here's what mine looked like. Yes, I like to use a lot of extra wire.

Once everything is working, re-assemble in reverse order.
Have another beer. Watch TV and wait until the sun goes down to marvel at your work.
What you will need:
1x medium to large flathead screwdriver
1x soldering iron and paraphernalia
1x 5mm amber LED
1x 1/2w 560ohm resistor (may be different depending on your LED)
1x loose 22 guage wire
*** All of the GREEN wire in this DIY has been added by me. You will not see any GREEN wire in your mirror. ***
Remove the front light/sunroof pod.
Pry the large light cover off by using a screwdriver towards the front of the cover near the mirror. You'll find a little notch there.
Once the cover is off, you'll see two white plastic tabs. Push them towards the mirror and pull down at the same time. The whole pod should pop out from the headliner. I used a screwdriver to pry while pushing on the tabs.
The back of the pod should have a few wiring harnesses plugged into it. You're looking for the small square white block in the corner. Disconnect it. ** This plug is important. It supplies the power to the bulb we're changing and the homelink circuit. You need to plug this back in if you want to test poliarity and your work.
There is a second wiring harness comming out from the mirror. Unplug this one too. The plug itself is tucked into the headliner and covered with foam padding.
Remove the mirror. Take a flat head screw driver and put it into the small opening at the base of the mirror. Hold the mirror with one hand and then pry downwards. It's held in there by very stiff spring clip so don't be shy.
** I've saved myself the trouble, but your mirror should now be in your hands. Go have a beer.
Ok, now insert a flathead screwdriver into the hole where the base meets the body of the mirror. I don't have a pic for this, but you can easily see what i'm talking about. Pry off the front bezel of the mirror. Work your way around the plastic and be carefull not to damage the plastic bezel.
Watch out, the guts of the mirror will fall out. There are 6 little rubber stoppers that fall out, the homelink box, and the mirror will all come loose.
Unplug the wiring harness from the back of the mirror and circuit board.
Use the flathead screwdriver to open the cover to the bulb. It locks on the right hand side.
Once you have the bulb out. Clip it off. There are 2 black wires going to the light. Since it's incandescant, they didn't bother to label them different colors. Wire up your LED and resistor in series. Remeber to test polarity of the LED. To test, go back and plug in the square white plug into the light/sunroof pod. Here's what mine looked like. Yes, I like to use a lot of extra wire.
Once everything is working, re-assemble in reverse order.
Have another beer. Watch TV and wait until the sun goes down to marvel at your work.
Last edited by e1000; 11-30-2008 at 04:40 PM.
Trending Topics
12-01-2008, 12:25 AM
#10
Super Member
e1000, I love how you replaced yours with an LED. I'd definitely do this, but I'm really not too good with soldering and LED's, resistors, etc. I'm not too electrically inclined. You're write up DIY is great, but I'm not sure if I'd be able to do what you did when it comes time to solder.
I was thinking that if I could get the light, I could do this myself. Basically replace the incandescent with a new incandescent bulb; keep it OEM. However, e1000...how would someone replace this bulb? Since I think you mentioned the wires were soldered on? Would the whole circuit board need to be replaced?
Also, is the LED much brighter than the OEM incandescent? If it is, then that might be the extra bump I'd need to do it myself.
Thanks,
Cintoman
12-01-2008, 12:42 AM
#11
Out Of Control!!
Thread Starter
Join Date: Nov 2005
Location: OC
Posts: 18,677
Likes: 0
Received 9 Likes
on
9 Posts
a quarter mile at a time
Yes, you're right Glyn. In fact, last Sat I went to another local MB dealership to see if the part was a warranty item, since I'm still covered by the 4yr/50,000mi warranty. Service/parts were closed so I'm not sure.
e1000, I love how you replaced yours with an LED. I'd definitely do this, but I'm really not too good with soldering and LED's, resistors, etc. I'm not too electrically inclined. You're write up DIY is great, but I'm not sure if I'd be able to do what you did when it comes time to solder.
I was thinking that if I could get the light, I could do this myself. Basically replace the incandescent with a new incandescent bulb; keep it OEM. However, e1000...how would someone replace this bulb? Since I think you mentioned the wires were soldered on? Would the whole circuit board need to be replaced?
Also, is the LED much brighter than the OEM incandescent? If it is, then that might be the extra bump I'd need to do it myself.
Thanks,
Cintoman
**EDIT** It's ALMOST too bright. So to give you an idea, you could read directions or maybe even a map if you hold it up to the air vent level. The LED I used throws at 25degrees so by the time it gets down to the shifter, the light is pretty diffused and illuminates an area a bit larger than a dinner plate. LED's can be dimmed by using different resistors. I may go back and turn it down a bit. Since the LED is amber though, the light isn't annoying at all.
Even if you were to replace the incandescant with another incandescant, there would be soldering involved.
What I COULD do is to solder up a little kit for you and once you get it, you could snip off the old light, strip 2 wires and connect them with small wire connectors. PM me if you're interested.
Last edited by e1000; 12-01-2008 at 12:48 AM.
The following users liked this post:
JD101b (09-12-2021)
 12-01-2008, 11:30 AM
#14
Super Moderator
Took the car out tonight and the LED is a lot brighter than the incandescant bulb it replaced. Put a NICE amber glow on my CF interior.
**EDIT** It's ALMOST too bright. So to give you an idea, you could read directions or maybe even a map if you hold it up to the air vent level. The LED I used throws at 25degrees so by the time it gets down to the shifter, the light is pretty diffused and illuminates an area a bit larger than a dinner plate. LED's can be dimmed by using different resistors. I may go back and turn it down a bit. Since the LED is amber though, the light isn't annoying at all.
Even if you were to replace the incandescant with another incandescant, there would be soldering involved.
What I COULD do is to solder up a little kit for you and once you get it, you could snip off the old light, strip 2 wires and connect them with small wire connectors. PM me if you're interested.
Paul - I would go the LED route then it will last almost indefinitely as long as you don't drive the LED too hard. My only worry was the resistor. Dropper resistors can run very hot but in this case the LED draws sooooooooooo little that it remains cool. Incandescants are always going to have a defined life.
This is really easy soldering - a lot easier than mounting that diffuser on the back of your car - but if you don't feel comfortable take up e on his kind offer.
12-01-2008, 12:03 PM
#15
Out Of Control!!
Thread Starter
Join Date: Nov 2005
Location: OC
Posts: 18,677
Likes: 0
Received 9 Likes
on
9 Posts
a quarter mile at a time
e - you are a very kind man & Cintoman is an excellent chap who I think all of us would help.
Paul - I would go the LED route then it will last almost indefinitely as long as you don't drive the LED too hard. My only worry was the resistor. Dropper resistors can run very hot but in this case the LED draws sooooooooooo little that it remains cool. Incandescants are always going to have a defined life.
This is really easy soldering - a lot easier than mounting that diffuser on the back of your car - but if you don't feel comfortable take up e on his kind offer.
I know how he feels. I hate it when even the smallest thing on my car isn't working. Drives me insane, even if NOONE else would ever notice.
12-01-2008, 12:44 PM
#16
Super Moderator
12-15-2008, 12:44 AM
#17
Super Member
Installed e1000's LED light
Hey Everyone,
Well I finally had some free time to install the replacement light for the ambient light that burnt out on me a few weeks back. A bunch of thanks and a big to e1000 for making me a nice little LED kit for me, and sending it my way. Very much appreciated.
e1000's DIY was spot on, and it made my install that much easier. There were a few minor tough things (MB sure makes a well engineered vehicle, each time I take something apart in my car, I continue to be amazed at the engineering they put into these cars). Things like removing the trim/bezel around the mirror, and especially snapping the whole thing back into the roof. Other than that, it was pretty simple.
I figured I take some pics; not regarding the DIY per se, but rather about the different components inside our rear view mirrors. Again, I continue to be amazed.
So here goes...
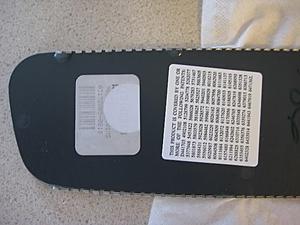
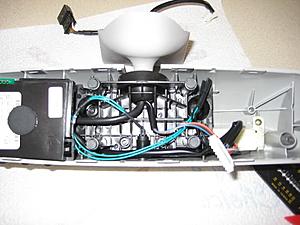
First pic is after I removed the clear main light housing. You can see one of the little tabs e1000 mentioned you have to push back so the overhead console comes out:
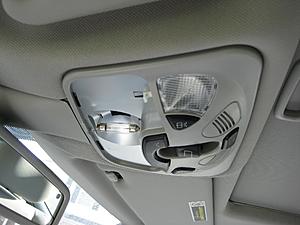
Here's the overhead console removed from the headliner:
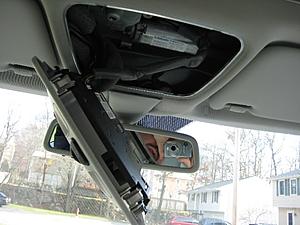
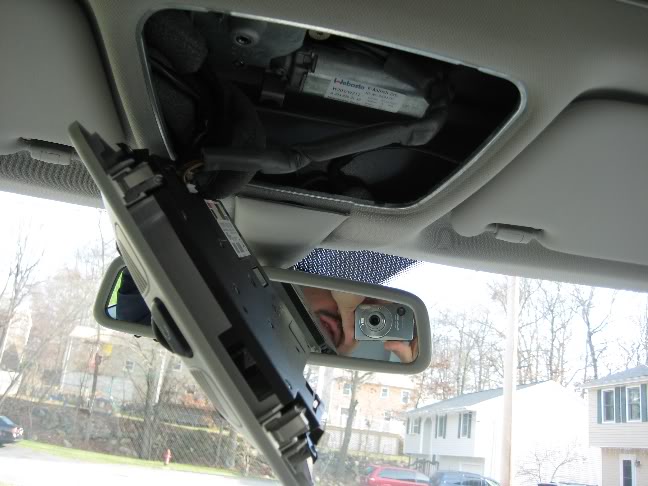
And now the rear view mirror completely removed. That spring has some serious tension on it:
Now the trim around the mirror was removed. This took a bit of time for me because 1) I didn't want to break any of the clips holding the two outer shells of the housing, and 2), I didn't want to damage or crack the housing. A couple of small screwdrivers with the tips taped with electrical tape helped:
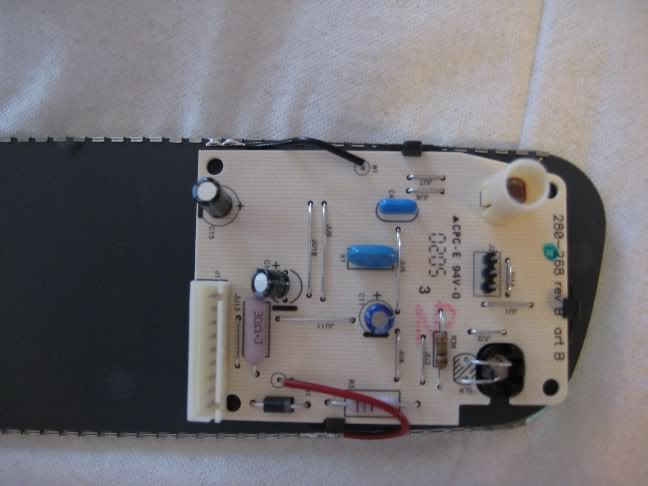
Here's the rear side of the mirror. The circuit board is for the light sensor that automatically dims the mirror, as well as the infrared sensor/emitter for the homelink system:
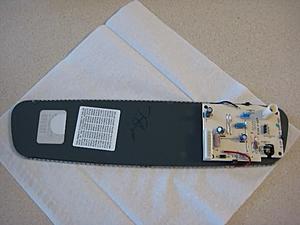
Closeup of the board:

Other side of the mirror. Are there enough patents on this thing?:
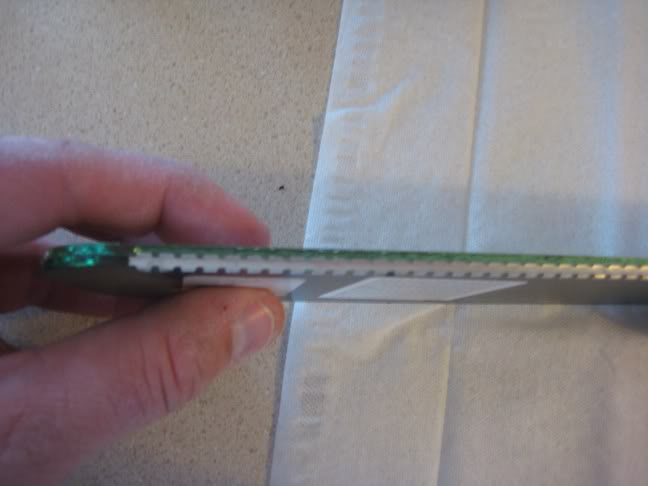
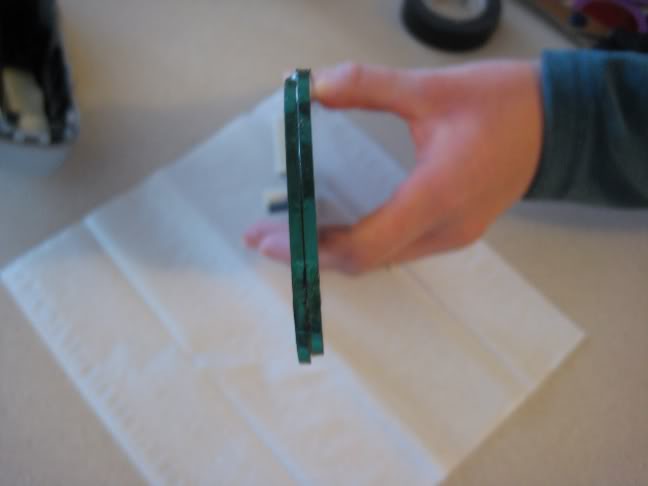
Here's a closeup of the connectors on the mirror that work to dim the mirror whenever the lights from cars behind you hit the mirror. What I found amazing is that our mirrors actually have 2 pieces of glass, attached slightly off each other. One glass piece has these connectors on the top, the other has them on the bottom. Not too sure how it all works (polarization maybe?), but heres the pic:

Sideview of the two panels that make up our mirrors. Note how they're not flush with each other:

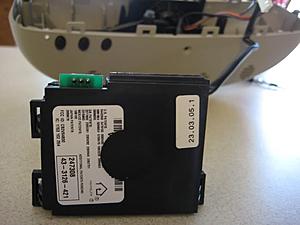
HomeLink unit:
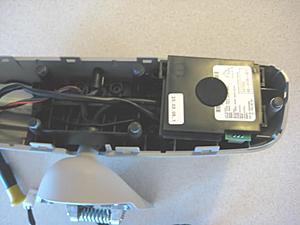
HomeLink unit removed:
e1000's wiring kit he made me already connected to the existing black wires that were originally connected to the OEM incandescent bulb. The extra long green wiring helped. Of course, the polarity was wrong, so I had to flip the wires:

New wiring and bulb completely installed:
Then came the toughest part, which was snapping the whole mirror unit back into the roof. That spring you saw in the third pic has some major tension on it, that it took all I could give it to pop it back in, and it still wouldn't snap back in. Finally took a torx screwdriver (because it has a flat tip) and pressed it against the little shiney triangular tip to push it in (and put tension on the spring) while pushing up on the mirror unit to snap it into place. Worked perfectly now.
As for the light output, it looks great. It's a bit brighter than OEM. The difference is definitely noticeably brighter, but not overly bright. I think you hit it perfectly e1000 with the resister you chose for me. I wouldn't want it any brighter, and anything less would have been just like OEM, which, in my opinion, was a little dim. So another big to e1000 for making this and sending it to me, and for his DIY. Couldn't have done it without him !!
Cintoman
Well I finally had some free time to install the replacement light for the ambient light that burnt out on me a few weeks back. A bunch of thanks and a big
to e1000 for making me a nice little LED kit for me, and sending it my way. Very much appreciated.e1000's DIY was spot on, and it made my install that much easier. There were a few minor tough things (MB sure makes a well engineered vehicle, each time I take something apart in my car, I continue to be amazed at the engineering they put into these cars). Things like removing the trim/bezel around the mirror, and especially snapping the whole thing back into the roof. Other than that, it was pretty simple.
I figured I take some pics; not regarding the DIY per se, but rather about the different components inside our rear view mirrors. Again, I continue to be amazed.
So here goes...
First pic is after I removed the clear main light housing. You can see one of the little tabs e1000 mentioned you have to push back so the overhead console comes out:

Here's the overhead console removed from the headliner:
And now the rear view mirror completely removed. That spring has some serious tension on it:

Now the trim around the mirror was removed. This took a bit of time for me because 1) I didn't want to break any of the clips holding the two outer shells of the housing, and 2), I didn't want to damage or crack the housing. A couple of small screwdrivers with the tips taped with electrical tape helped:

Here's the rear side of the mirror. The circuit board is for the light sensor that automatically dims the mirror, as well as the infrared sensor/emitter for the homelink system:

Closeup of the board:
Other side of the mirror. Are there enough patents on this thing?:

Here's a closeup of the connectors on the mirror that work to dim the mirror whenever the lights from cars behind you hit the mirror. What I found amazing is that our mirrors actually have 2 pieces of glass, attached slightly off each other. One glass piece has these connectors on the top, the other has them on the bottom. Not too sure how it all works (polarization maybe?), but heres the pic:
Sideview of the two panels that make up our mirrors. Note how they're not flush with each other:
HomeLink unit:

HomeLink unit removed:

e1000's wiring kit he made me already connected to the existing black wires that were originally connected to the OEM incandescent bulb. The extra long green wiring helped. Of course, the polarity was wrong, so I had to flip the wires:

New wiring and bulb completely installed:

Then came the toughest part, which was snapping the whole mirror unit back into the roof. That spring you saw in the third pic has some major tension on it, that it took all I could give it to pop it back in, and it still wouldn't snap back in. Finally took a torx screwdriver (because it has a flat tip) and pressed it against the little shiney triangular tip to push it in (and put tension on the spring) while pushing up on the mirror unit to snap it into place. Worked perfectly now.
As for the light output, it looks great. It's a bit brighter than OEM. The difference is definitely noticeably brighter, but not overly bright. I think you hit it perfectly e1000 with the resister you chose for me. I wouldn't want it any brighter, and anything less would have been just like OEM, which, in my opinion, was a little dim. So another big
to e1000 for making this and sending it to me, and for his DIY. Couldn't have done it without him !!Cintoman
12-15-2008, 01:47 AM
#18
Out Of Control!!
Thread Starter
Join Date: Nov 2005
Location: OC
Posts: 18,677
Likes: 0
Received 9 Likes
on
9 Posts
a quarter mile at a time
sweeeeeeeeeeet!! Great job on the extra pics. I get all mad scientist and never take good pics.
I actually changed mine out again to the same resistor I sent you and agree it's at a much better output level.
Oh yeah, I forgot to mention that putting the mirror back on is like the worlds worst case of constipation x 100. hahah.
Good job!!!!!!
I actually changed mine out again to the same resistor I sent you and agree it's at a much better output level.
Oh yeah, I forgot to mention that putting the mirror back on is like the worlds worst case of constipation x 100. hahah.
Good job!!!!!!
12-15-2008, 01:59 AM
#19
Super Member

Boy was it ever. I thought I was going to put a hole thru the roof I was pressing/pushing so hard to get that thing back in!!! I must have put myself in about 10 different positions inside my car to maximize my ability to press up on this mirror: sitting in the driver's seat, then passenger seat, then sitting on the center arm rest, then stomach on the center arm rest with my legs towards the back seat, then one foot on each seat (shoes off, or course) with my body thru the sunroof....oh yeah, must have been one heck of a sight for my neighbors to enjoy, as I was trying to put that back on.
I swear, a 100 lb person could probably do chinups with the mirror mounted to the roof.
Cintoman
12-15-2008, 02:51 AM
#20
Super Moderator
Excellent! e I think you must go into production at $50 a pop. You will make lots of money like Sprintbooster!
 12-15-2008, 08:24 AM
#24
Out Of Control!!
Thread Starter
Join Date: Nov 2005
Location: OC
Posts: 18,677
Likes: 0
Received 9 Likes
on
9 Posts
a quarter mile at a time
I can also make them pretty much any color that LED's come in. (superwhite, blue, green, orange, red)
I don't know if a pre-facelift can be done. If someone can take apart thier mirror and snap me a picture I can see if it's possible.
12-15-2008, 08:55 AM
#25
Super Moderator
You can make them in different colours and different brightness to order


