Lowering DIY: The $70 COMPLETE DROP
 02-01-2008, 01:06 AM
#1
Senior Member
Thread Starter

I have learned a little about lowering here goes....
You have to have one of two things;
1. Money
2. Time and Determination
I like to keep #1 so I chose #2 for my project
There are four ways to lower a mercedes with ABC or air shocks.
1. Have a tech reprogram the computer with a program called star diagnose (rarely happens)
2.Expensive module that tricks computer by altering potentiometer signal on all wheels (expensive and cut wires usually are a no no for us... hard to remove also) $1200 plus
3. Lowering links to readjust potentiometers tricking computer (easy as a lazy sunday with a monday holiday)
4. Add washers to the FRONT only to extend or space the rod making it longer.
So I chose lowering links (after only having washers in front) since my tech did not have the expensive equip to read the angles on the suspension to trick the computer.
The cheapest I have seen links for sale is at adjustableairride.com and their links require no unbolting or bolting, but this does mean you ruin your stock links, as you pry them off the ball hinge making it darn near impossible to put back on. I chose to make my own, all for less than $70.00 which we will add up later off my receipt.
So what do we need hardware wise?
1 set of metric wrenches
1 set of standard wrenches
1 socket set
1 hacksaw
vise or vise grips
(possibly drill and tap set to thread aluminum)
8 adjustable rod ends
1 3' threaded rod to match
8 locking nuts (plastic inside on end) to match rod
8 regular nuts to match rod
(possibly aluminum angle - a few inches)
(Possibly 8- 1/4" washers if so cut the other materials in half as you will only need 2 links)
Where do we begin?
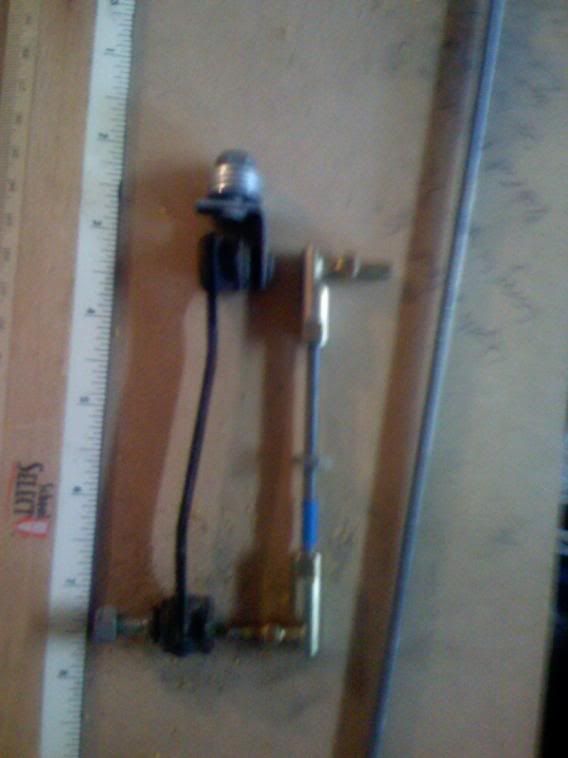
Remove the front rim and look for this... it is your front link you will replace with an adjustable one...or
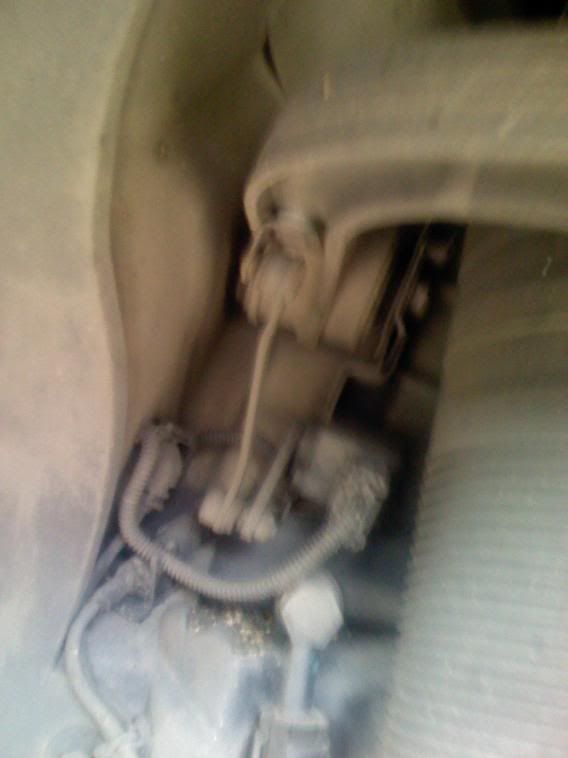
Notice the silver at the top of the rod
This is where you will put the washers after you remove the nut on top of the arm with a 10mm socket. the drop is a 4:1 ratio 4 washers are about 1/4" and give you a perfect 1" drop... super simple and accurate since the washers are the same thickness.
To lower the car:
In the front the arm needs to be LONGER so extending the length or adding washers does the trick, while the back we must SHORTEN the rod.
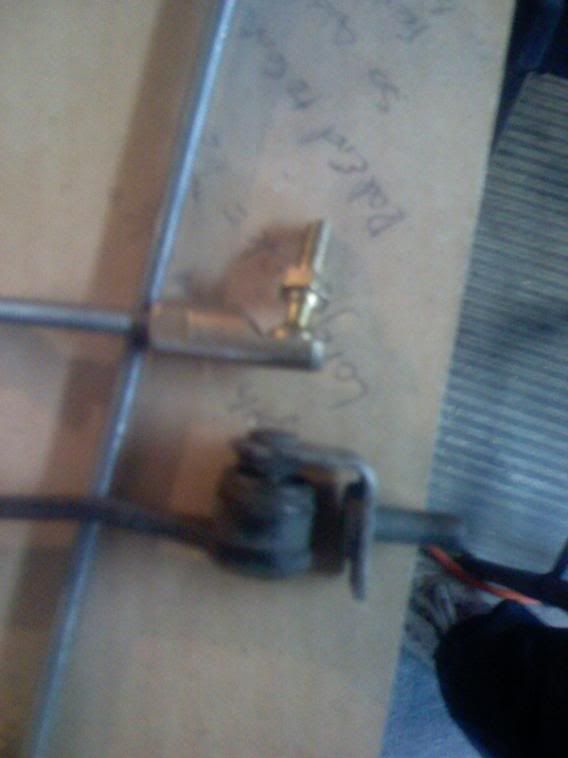
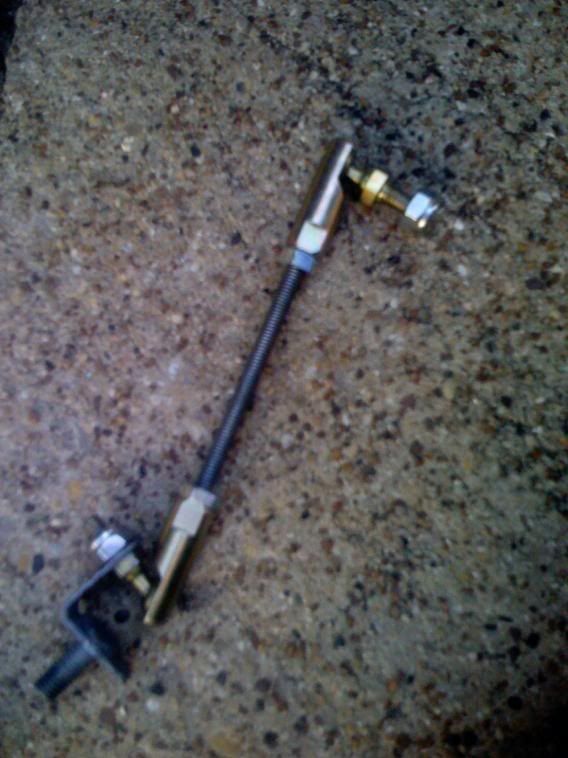
Here is a photo of the rod ends I purchased. 10/32 threaded rod end so all hardware must match this. It is a bit smaller than the original, but this ensured it fit without making the hole bigger or an additional trip (1hr) to the hardware store.
The rods have no load on them so they don't need to be super strong...yes we can bend the threaded rod, but will it get bent while installed... not likely
Remove the front link and measure the link from the bolt to the bolt to determine stock rod length.... I have the measurements and will edit/add later ... this is the front min length you want since we LENGTHEN for the front.
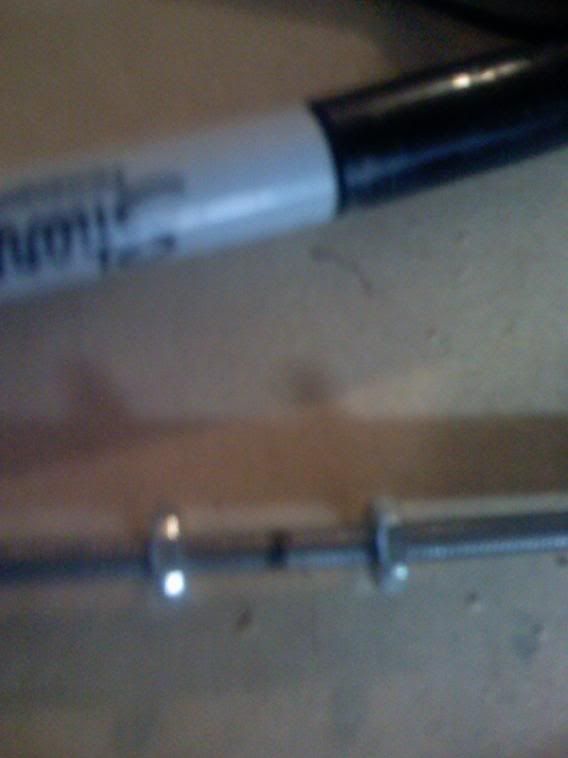
Determine the depth the rod end will screw onto your thread rod and cut the length accordingly... mine went on 1/2" each so I measured and made my rod with the ends screwed on abit longer than stock and with almost 1" of adjustment possible I could slam my car where the tires bent the plastic wells... we have plenty of room to slam the car if we wish.
So before you cut mark the line you will cut with a sharpie and place two nuts on either side of cut so after you cut them you can unscrew the nuts correcting the bent threads.... excellent trick
So make the link...
Make sure you put the nuts in the mddle of the rod to screw tight onto the rod ends to prevent ends from moving after length is set...
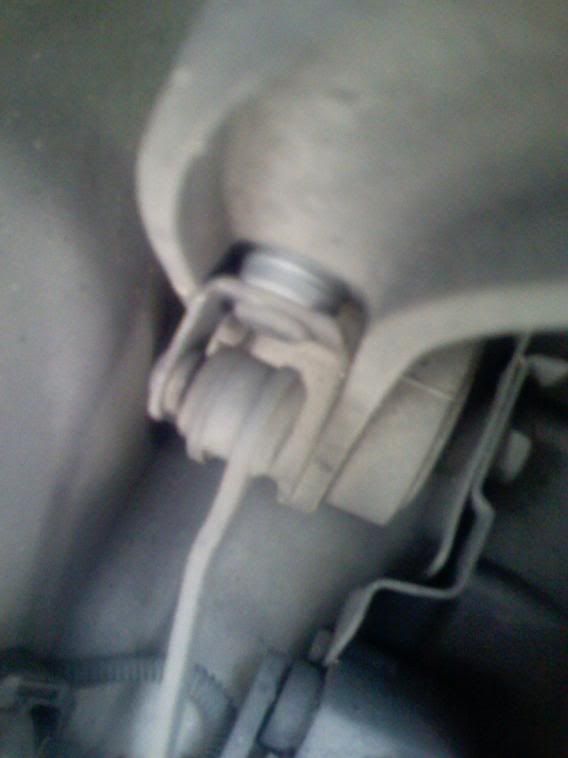
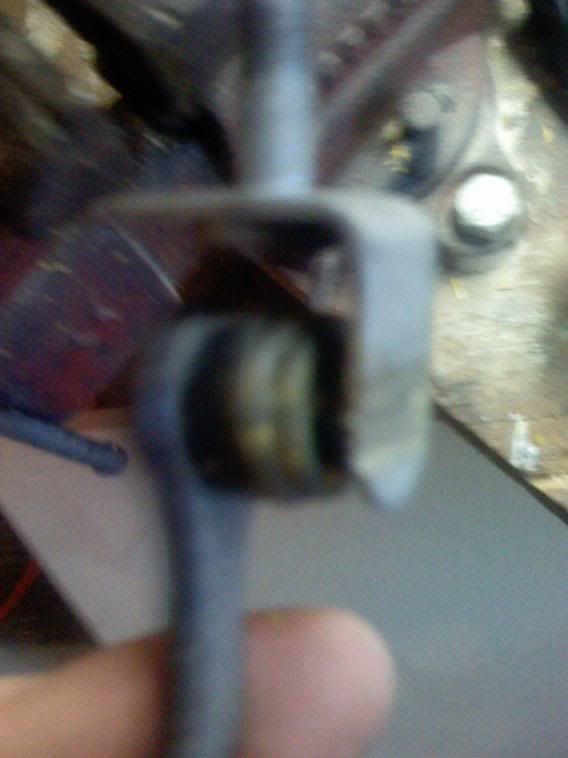
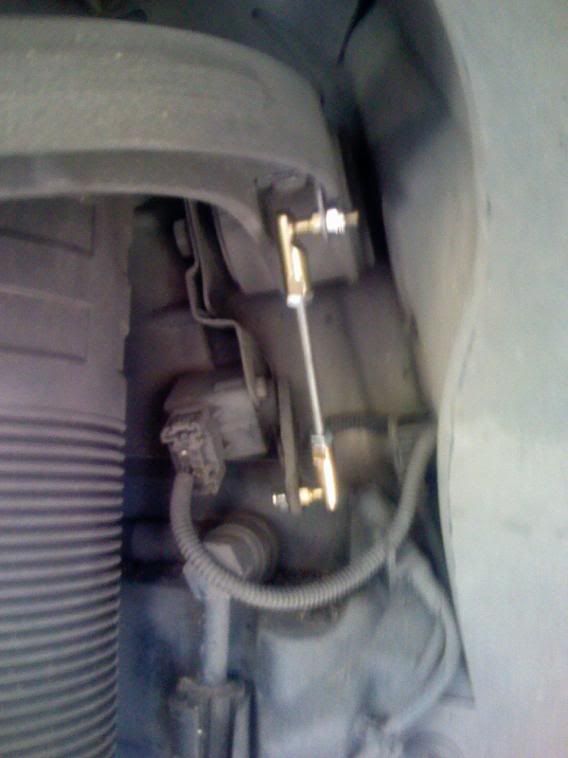
Now notice the difference, we need to make the angle attachment... you have one of two options here...
1. cut angle aluminum similar drilling a top hole and a side hole and threading one hole on top. Place the rod end through the bottom/side hole and attach. use a bolt to travel through the top of suspension arm and screw into newly threaded aluminum angle to attach
2. cut stock link and to remove rivit and bolt onto new link... super easy but this ruins your stock link... I didn't care however...
Punch out rivit and attach... your front link souuld now look like this
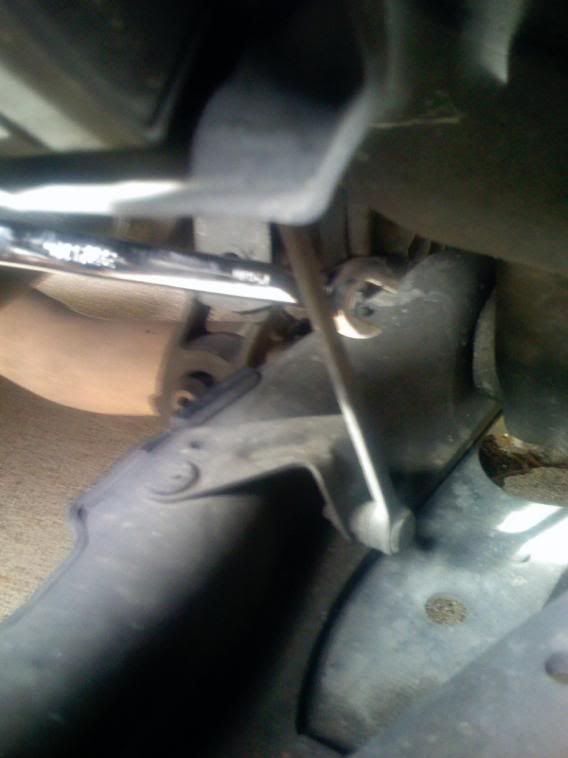
Make both front links at one time and adjust to the same length. Use the 4:1 drop ratio to calculate approximate drop. I dropped 1" so my rod length (measurement from center of stock bolt) comapred to new rod length (center to center again) was 1/4" longer Lock the rods into place once made to match. Put one on and replace tire. Start car and press the raise button then lower to fully lowered your car will reflect new rod. If you like it great, if not adjust, BUT when you do adjust the other rod AT THE SAME TIME... this will save a headache later, so you can just slap the other side on and get it correct with little worries.
BAM... this is what it looks like on
NOW The Back...
Pain to remove... little half turns with two wrenches... A true test of patience...
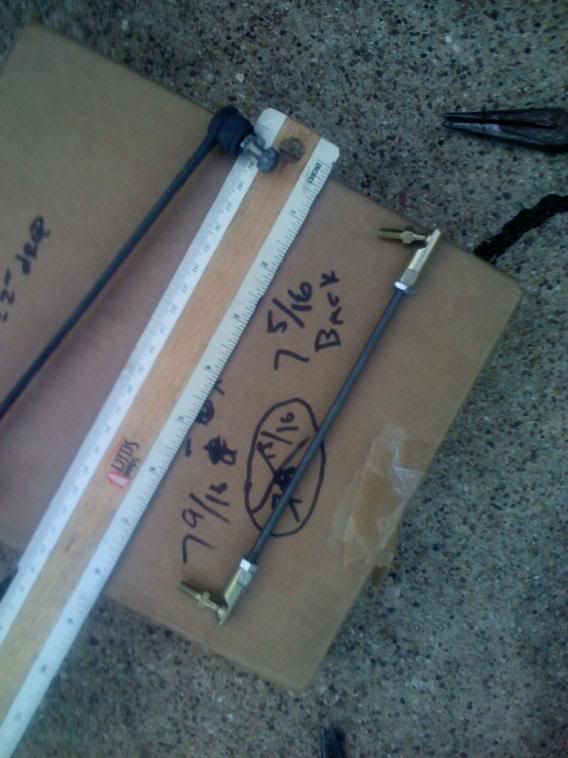
Make the rod as before... but REMEMBER these have to SHORTEN so measure and barely screw them on to recreate the stock length, so they can be shortened to achieve drop... mine wer 7 9/16" stock so with a 1" drop I made the rods (center of bolt to center of bolt) 7 5/16" 1/4" difference= 1" drop

Easy wasn't it...
Bolt em up as before...
PRESTO!!! U GOT DROP
What would I do if I were you??? I would do the washer drop for the front using 4 washers 1/4" total for a 1" drop and make links for the back and match the drop. You will have all the stock links to replace if necessary. 1" is a good drop all the way around for me. Well I think mine is 1 1/4" but anyway. Spread the word and I feel this post is a good sticky. THIS WORKS FOR ALL ABC AND AIRRIDE. Just make sure the model you have adjusts the same way... longer in front to drop and shorter in back to drop... use common sence this is not hard stuff!!!
8 ends @ $8.02 ea
8 nuts @ .10 ea
8 plastic lock nuts
@ .17 ea
3' threaded rod
@ 1.67
68.47 + tax
So I lied... a little over $70 with tax, but who really cares. Let it be the "$70 DROP," You actually could do it for about half with the washers for the front drop.
You have to have one of two things;
1. Money
2. Time and Determination
I like to keep #1 so I chose #2 for my project
There are four ways to lower a mercedes with ABC or air shocks.
1. Have a tech reprogram the computer with a program called star diagnose (rarely happens)
2.Expensive module that tricks computer by altering potentiometer signal on all wheels (expensive and cut wires usually are a no no for us... hard to remove also) $1200 plus
3. Lowering links to readjust potentiometers tricking computer (easy as a lazy sunday with a monday holiday)
4. Add washers to the FRONT only to extend or space the rod making it longer.
So I chose lowering links (after only having washers in front) since my tech did not have the expensive equip to read the angles on the suspension to trick the computer.
The cheapest I have seen links for sale is at adjustableairride.com and their links require no unbolting or bolting, but this does mean you ruin your stock links, as you pry them off the ball hinge making it darn near impossible to put back on. I chose to make my own, all for less than $70.00 which we will add up later off my receipt.
So what do we need hardware wise?
1 set of metric wrenches
1 set of standard wrenches
1 socket set
1 hacksaw
vise or vise grips
(possibly drill and tap set to thread aluminum)
8 adjustable rod ends
1 3' threaded rod to match
8 locking nuts (plastic inside on end) to match rod
8 regular nuts to match rod
(possibly aluminum angle - a few inches)
(Possibly 8- 1/4" washers if so cut the other materials in half as you will only need 2 links)
Where do we begin?
Remove the front rim and look for this... it is your front link you will replace with an adjustable one...or
Notice the silver at the top of the rod
This is where you will put the washers after you remove the nut on top of the arm with a 10mm socket. the drop is a 4:1 ratio 4 washers are about 1/4" and give you a perfect 1" drop... super simple and accurate since the washers are the same thickness.
To lower the car:
In the front the arm needs to be LONGER so extending the length or adding washers does the trick, while the back we must SHORTEN the rod.
Here is a photo of the rod ends I purchased. 10/32 threaded rod end so all hardware must match this. It is a bit smaller than the original, but this ensured it fit without making the hole bigger or an additional trip (1hr) to the hardware store.
The rods have no load on them so they don't need to be super strong...yes we can bend the threaded rod, but will it get bent while installed... not likely
Remove the front link and measure the link from the bolt to the bolt to determine stock rod length.... I have the measurements and will edit/add later ... this is the front min length you want since we LENGTHEN for the front.
Determine the depth the rod end will screw onto your thread rod and cut the length accordingly... mine went on 1/2" each so I measured and made my rod with the ends screwed on abit longer than stock and with almost 1" of adjustment possible I could slam my car where the tires bent the plastic wells... we have plenty of room to slam the car if we wish.
So before you cut mark the line you will cut with a sharpie and place two nuts on either side of cut so after you cut them you can unscrew the nuts correcting the bent threads.... excellent trick
So make the link...
Make sure you put the nuts in the mddle of the rod to screw tight onto the rod ends to prevent ends from moving after length is set...
Now notice the difference, we need to make the angle attachment... you have one of two options here...
1. cut angle aluminum similar drilling a top hole and a side hole and threading one hole on top. Place the rod end through the bottom/side hole and attach. use a bolt to travel through the top of suspension arm and screw into newly threaded aluminum angle to attach
2. cut stock link and to remove rivit and bolt onto new link... super easy but this ruins your stock link... I didn't care however...
Punch out rivit and attach... your front link souuld now look like this
Make both front links at one time and adjust to the same length. Use the 4:1 drop ratio to calculate approximate drop. I dropped 1" so my rod length (measurement from center of stock bolt) comapred to new rod length (center to center again) was 1/4" longer Lock the rods into place once made to match. Put one on and replace tire. Start car and press the raise button then lower to fully lowered your car will reflect new rod. If you like it great, if not adjust, BUT when you do adjust the other rod AT THE SAME TIME... this will save a headache later, so you can just slap the other side on and get it correct with little worries.
BAM... this is what it looks like on
NOW The Back...
Pain to remove... little half turns with two wrenches... A true test of patience...
Make the rod as before... but REMEMBER these have to SHORTEN so measure and barely screw them on to recreate the stock length, so they can be shortened to achieve drop... mine wer 7 9/16" stock so with a 1" drop I made the rods (center of bolt to center of bolt) 7 5/16" 1/4" difference= 1" drop
Easy wasn't it...
Bolt em up as before...
PRESTO!!! U GOT DROP
What would I do if I were you??? I would do the washer drop for the front using 4 washers 1/4" total for a 1" drop and make links for the back and match the drop. You will have all the stock links to replace if necessary. 1" is a good drop all the way around for me. Well I think mine is 1 1/4" but anyway. Spread the word and I feel this post is a good sticky. THIS WORKS FOR ALL ABC AND AIRRIDE. Just make sure the model you have adjusts the same way... longer in front to drop and shorter in back to drop... use common sence this is not hard stuff!!!
8 ends @ $8.02 ea
8 nuts @ .10 ea
8 plastic lock nuts
@ .17 ea
3' threaded rod
@ 1.67
68.47 + tax
So I lied... a little over $70 with tax, but who really cares. Let it be the "$70 DROP," You actually could do it for about half with the washers for the front drop.
Last edited by onelightmind; 02-01-2008 at 01:11 AM.

The following users liked this post:
smartadze (05-11-2017)
02-01-2008, 11:20 AM
#3
Member

Join Date: Jun 2006
Posts: 172
Likes: 0
Received 0 Likes
on
0 Posts
Hey Onelightmind, I'm dissapointed! Where are the pictures of the car with the drop? You had me reading every word with the "assumption" that at the end you would post a finished product.. lol..
Needless to say, I'm kidding about the dissapointment. That was an excellent contribution, for all of us. Thanks for taking the time to do that with the pictures and all. Real nice job!
PS: Would still love to see some picture of the car and what it looks like with the drop (and the exhaust).
Needless to say, I'm kidding about the dissapointment. That was an excellent contribution, for all of us. Thanks for taking the time to do that with the pictures and all. Real nice job!
PS: Would still love to see some picture of the car and what it looks like with the drop (and the exhaust).
Last edited by deviilsadvocate; 02-01-2008 at 11:29 AM.
02-02-2008, 10:20 PM
#4
Senior Member
Thread Starter
It always seems to be dark when I decide to take a pic.... damn... Well as for the audio update... I have the sub mounted and it looks mean. I have both doors done with components installed. I now need to mount the amps. i am currently making an amp rack to fit on the trunk. It will also be a sweet thread. Well I promise tomorrow i will finish my audio and clean up the ride for some pics. By the way... the drop looks mean.
As for the washers question.... Well I don't care about my stock links, and I had promised a tech write up for you two, so I was stuck making the front links. If i hadn't promised a tech, I probably would have kept the washers they worked just as well. The links only gave me an extra 1/4" drop and were much more time consuming. If i were you guys I would start my whole drop project with 1/4" washers and make rear links. PM me if you need rod ends I had the place I purchased mine buy 16 extra in case some people wanted me to help out. This is easily accomplished in a few hrs so don't b scared.
As for the washers question.... Well I don't care about my stock links, and I had promised a tech write up for you two, so I was stuck making the front links. If i hadn't promised a tech, I probably would have kept the washers they worked just as well. The links only gave me an extra 1/4" drop and were much more time consuming. If i were you guys I would start my whole drop project with 1/4" washers and make rear links. PM me if you need rod ends I had the place I purchased mine buy 16 extra in case some people wanted me to help out. This is easily accomplished in a few hrs so don't b scared.
Last edited by onelightmind; 02-02-2008 at 10:27 PM.
02-03-2008, 05:55 PM
#5
Senior Member
Thread Starter
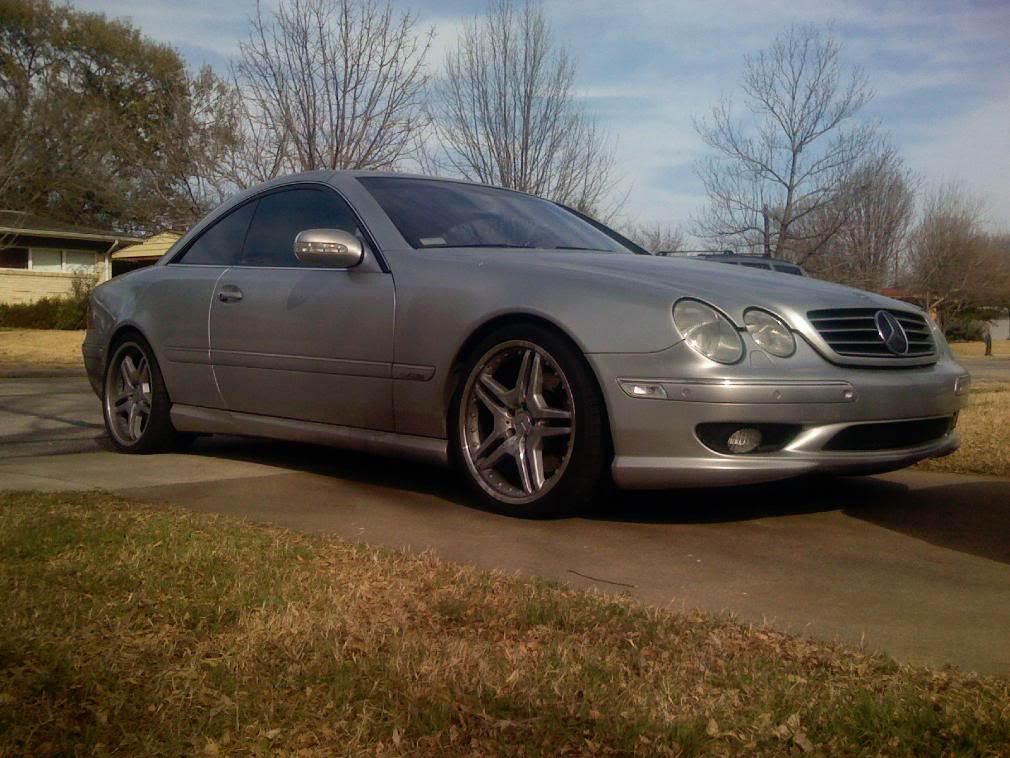
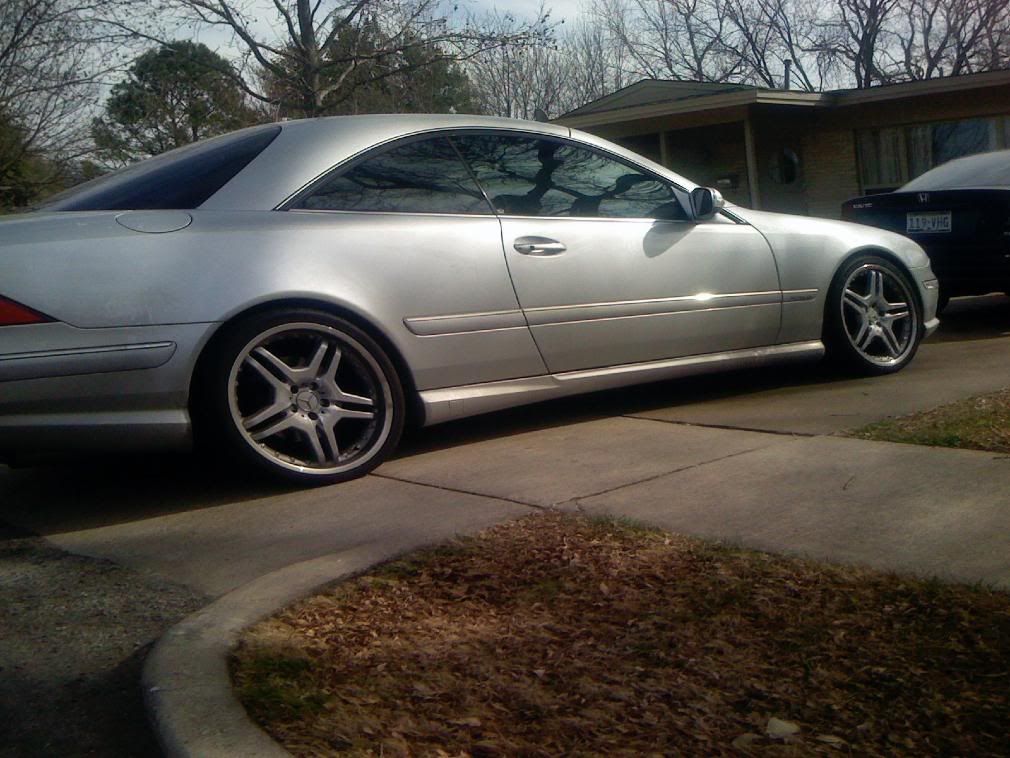
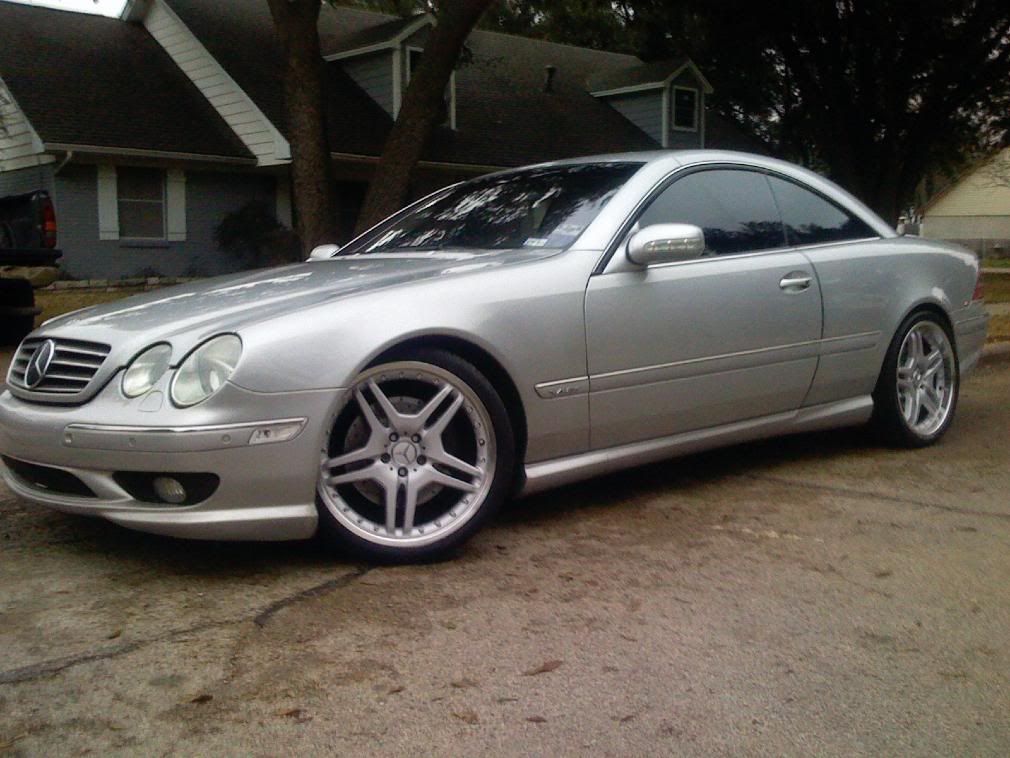
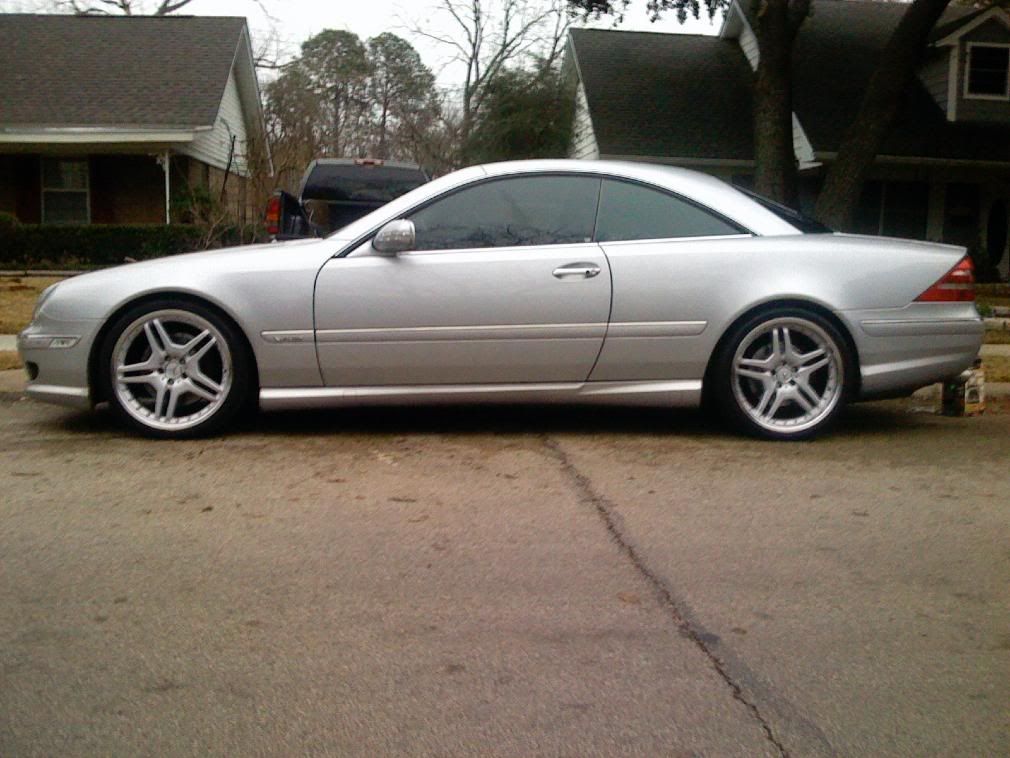
Ok here it is... dirty dirty dirty forgive me... just noticed how crappy the photos are. I will wash it up and take some sunny pics so you can see the top of the tires. It is dropped more than it appears in these photos
Trending Topics
 02-21-2008, 08:39 PM
#11

That looks really nice! That's the way Mercedes should have built the CL, just like the 05+ C class: No ugly wheel gaps!
Will the computer throw any code by lowering the car mechanically?
Jon
Will the computer throw any code by lowering the car mechanically?
Jon
02-21-2008, 08:58 PM
#12
Senior Member
Thread Starter
Nope, tested to 130 today. You must however, know where the severe road bumps and dips are. My tires are 295 in the back so they rub on an extreme bump at high speed when the car is dropped an additional inch.
 02-23-2008, 05:23 PM
#14
Senior Member
Join Date: Oct 2007
Location: Northern Virginia
Posts: 344
Likes: 0
Received 0 Likes
on
0 Posts
Big and Heavy 03 CL
Onelight,
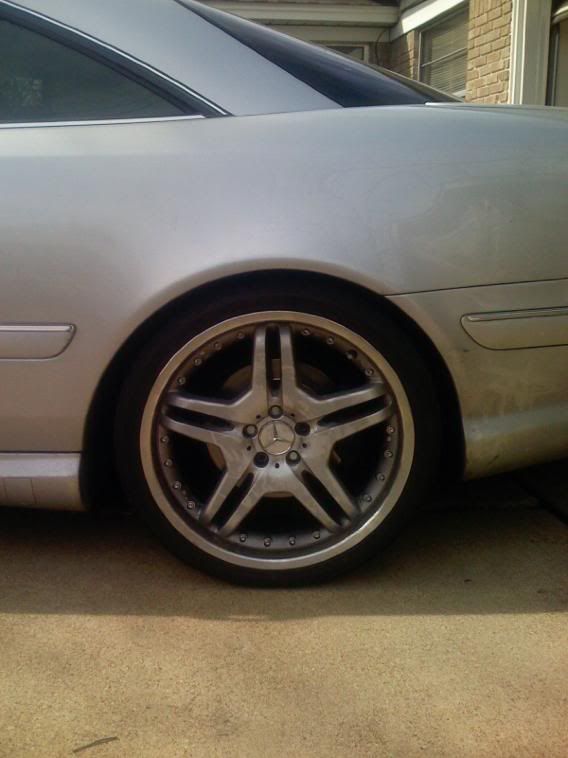
I noticed in some of your pictures that the rear lug bolts look different...or absent. Do you have caps over the bolts and some are just missing?
I noticed in some of your pictures that the rear lug bolts look different...or absent. Do you have caps over the bolts and some are just missing?
02-24-2008, 12:05 PM
#16
Senior Member
Join Date: Oct 2007
Location: Northern Virginia
Posts: 344
Likes: 0
Received 0 Likes
on
0 Posts
Big and Heavy 03 CL

 05-06-2008, 06:38 PM
#19
Senior Member
Thread Starter
05-27-2008, 10:35 PM
#20
Member

Join Date: Mar 2007
Posts: 78
Likes: 0
Received 0 Likes
on
0 Posts
03 cl500,04 range rover, 04 cayenne turbo, 08 yukon denali
I did mine last week. I've noticed the car pulling to the right now. Do you know if you are supposed to make the front L/R the same length? would it cause the alignment to go out of wack if one was a mm off or two?
05-30-2008, 09:14 PM
#21
Member
Join Date: Mar 2007
Posts: 78
Likes: 0
Received 0 Likes
on
0 Posts
03 cl500,04 range rover, 04 cayenne turbo, 08 yukon denali
Can anyone help me with this? I am wondering if the links should be the same length for the L/R.. After I installed mine i've noticed the car pulling to the right.
06-20-2008, 01:55 AM
#22
Senior Member
Thread Starter
If you made the links measure wheel space on each side and make adjustments. Washers should be the same. You need to do a FULL alignment!!! EVERYTHING IS OFF!!! Trust me the car will shake if you don't get it done. Should be something like $50 for a lifetime alignment membership at NTB... DO IT!!


