Mercedes-Benz C-Class: How to Change Automatic Transmission Fluid
Modern automatic transmissions are as much hydraulic devices as they are mechanical devices. The hydraulic fluid must be a coolant, a lubricant, an anti-foam, and a hydraulic fluid used as a torque transfer medium in the torque converter. Most OEM manufacturers define the transmission fluid as "lifetime fill." But in reality, it is good practice to drain the fill, replace the transmission fluid filter, and refill with the proper transmission fluid every 50,000 miles.
This article applies to the Mercedes-Benz C-Class w204 (2007-2014).
As automatic transmission fluid ages, the additive package "shears." This "shearing" process reduces the effectiveness of each job the transmission fluid must accomplish. The additive package in transmission fluid includes friction modifiers for bearing lubrication, viscosity modifiers to create the viscosity profile adequate for the oil's application, silicon anti-foaming, and additives to help with the heat transfer properties of the fluid. As the fluid is used, these additives are used up and broken down, which must be replaced. The easiest way to replace the additives is with an oil change.
Transmission drain plug copper washer (12 x 16 x 1.5mm)
Plastic lock tab for transmission fill tube cap
Figure 1. Tools and supplies required to complete the job.
Step 1 – Jack up the car
Jack up your car and support it with jack stands, or use a lift so that you have easy access to the bottom of the transmission. The car must be level in order to get the correct fluid level when refiling the transmission.
Step 2 – Remove the plastic aerodynamic underbelly pan
There are approximately ten small bolts holding the plastic underbelly pan that protects the bottom of the engine and the transmission. Remove the bolts and pan to gain clearance to the transmission fluid pan.
Step 3 – Remove the transmission pan drain bolt
Place a drain pan of at least 10 quarts under the transmission pan drain bolt to catch the transmission fluid. Then use a ratchet with 5mm Hex bit to remove the drain bolt and allow all the fluid to drain.
Figure 2. Transmission drain bolt removal.
Step 4 – Remove the transmission pan
Using the ratchet with T30 Torx bit, remove all the bolts holding the transmission pan onto the transmission case. Once the bolts are all removed, the pan will fall off. Clean the mating surface on transmission case and remove the old gasket from the transmission pan. Clean any debris from inside the transmission pan and make sure to remove all lint or dust that might be left-over from the cleaning. Then install the new pan gasket.
Figure 3. Clean transmission pan and remove the gasket.
Figure 4. Install the new transmission pan gasket.
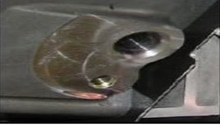
Step 5 – Replace the transmission fluid filter
Pull down on the fluid filter neck to remove it from the valve body, and take care to collect any fluid that remains in the filter. Install the new filter in reverse order. Attach the filter neck to the valve body, and press the filter firmly into place. You should feel a small pop or click as the filter neck sealing ring is inserted into the valve body.
Figure 5. Replace the transmission fluid filter.
Step 6 – Re-install the transmission oil pan
Place the transmission pan back into position on the bottom of the transmission case. Ensure the gasket is in place on the pan and not pinched. Install and torque the T30 Torx bolt to 10 ft-lbs. Re-install the drain plug and torque it to 25 ft-lbs.
Figure 6. Position spacer to secure "lip" of the pan.
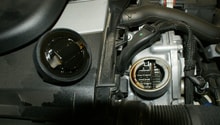
Step 7 – Add the transmission fluid
Remove the lock clip from the transmission filler tube and remove the cap. Fill the transmission with approximately five liters of fluid. After adding the fluid, shift from reverse to drive several times while the engine is running; make sure your foot is on the brake. Drive your car for 15 minutes to heat up the transmission fluid to operating temperatures. Check the fluid level with the dipstick fluid. The oil should be at the center of the "hot" area of the tip. Then replace the filler tube cap and lock clip.
Figure 7. Remove the filler tube's lock clip.
Figure 8. Pour in transmission fluid through the filler tube.
Figure 9. Correct transmission fluid level indicator on the dipstick.
How to Change Automatic Transmission Fluid
Keep your E-Class' transmission healthy by changing the automatic transmission fluid.
This article applies to the Mercedes-Benz E-Class w211/w212 (2002-Present).
While ...
How to Change Oil
Is your change oil indicator light on? Take on the job yourself with the help of this how-to.
This article applies to the Mercedes-Benz C-Class (2007-2014).
Engine oil is pumped up from the oil ...
How to Check Transmission Fluid
Learn how to check the transmission fluid level in the Mercedes-Benz E-Class or E-Class AMG.
This article applies to the Mercedes-Benz E-Class and E-Class AMG (2002-2009).
For a ...
How to Change Your Oil and Oil Filter
Keep up on the maintenance for your E-Class, and minimize engine wear by changing your oil as well as oil the filter.
This article applies to the Mercedes-Benz w211/w212 ...
How to Replace Radiator
When it's time to replace the radiator in your Mercedes-Benz E-Class, do not procrastinate. Avoid being a side of the road spectacle and replace your radiator as quickly as possible.
This ...
Why is My Car Leaking Oil?
It's disheartening to see a puddle of oil underneath your Mercedes-Benz C-Class w204, or around engine parts. This is especially annoying if the car is new.
This article applies to the ...