Mercedes-Benz E-Class and E-Class AMG: How to Replace Ball Joints
If you do hear a squeak, it might be time to change out your ball joints. Here is a quick run through of how to do just that.
This article applies to the Mercedes-Benz E-Class and E-Class AMG w211 (2002-2009).
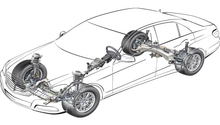
Sometimes, the components on vehicles that encounter the most wear are the links that hold it all together. This is especially true when it comes to your suspension. Most suspension components are made to be quite tough. But no matter just how tough they are, they have certain parts that take quite a beating. In the case of your suspension, one of these parts is the ball joints. These joints usually link together the top control arm and the bottom control arm to the steering knuckle, which is what your car's wheel is attached to. The control arms themselves are what attaches that whole assembly to the car's frame or underbody. All of the force that your wheel encounters is transferred through these joints into the control arms, and finally to the main structure of the car. So as you can see, these joints are quite important and also take quite the beating. Luckily, they can be changed out. Unluckily, it is quite a labor intensive process that will require a fair amount of work.
A good way to determine if your car does need a ball joint change is first by sound and then feel. As far as sound goes, if you go over speed bumps or other bumps and you hear a squeaking noise coming from your front end, that is a good indicator that you need a ball joint replacement. On the feel side, if you are feeling a shimmy at high speeds or sloppiness in the steering at low speeds, it could indicate you need to change out your ball joints. To be sure, the best way to tell is to raise the car's front wheels off the ground and try and move the wheel by hand. If you can move it around in more directions than the way it moves to steer, then it could be time for a ball joint change. Finally, you can also a look at the ball joint itself. If the rubber boot that surrounds it is torn, this is definitely a good indication that you need a ball joint change.
Materials Needed
- Millimeter socket set sizes 12mm-22mm
- Millimeter wrench set sizes 12mm-22mm
- T45 Torx bit
- Ratchet
- Jack and jack stands
- Ball joint installation and removal tool
- Ball joint separator
- Air tools (impact wrench, air ratchet)
- Wire or zip ties
Before beginning, remember this is quite a labor intensive repair. If there is any doubt that you cannot perform any of this, then you should seek someone who has the knowledge and experience to do so. Improper repairs to your car's suspension can result in horrible consequences.
As far as the special tools go. Most local auto parts stores will rent you these special tools for free as long as you leave a deposit that you will get returned to you upon bringing the tool back.
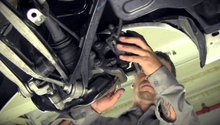
Step 1 – Lift car and remove wheels
First thing you are going to want to do is elevate the car off the ground. You only need to elevate the wheels of the ball joints you will be working on. In this case, it is the removal and installation of the front ball joints, so you will only need to elevate the car's front wheels off the ground. For added safety, make sure to apply the parking brake and block the rear wheels before doing this. These vehicles are equipped with jacking points and points to place the jack stands on. Make sure to use these to prevent any damage to the underbody of the car.
Once you have elevated the car, remove the wheel of the side you are going to be replacing the ball joints on.
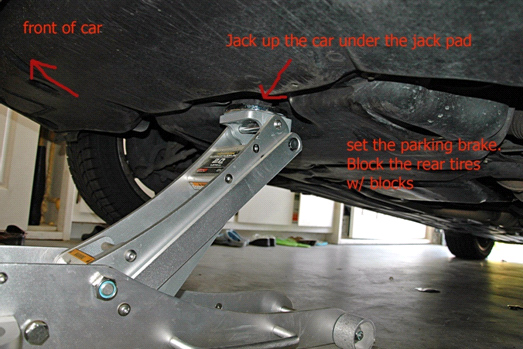
(Related Article: How to Jack Up Your Car - MBWorld.org)
Step 2 – Locate the upper and lower ball joint
First thing you are going to want to do after removing the wheel is locate the ball joints. The upper ball joint is located at the end of the upper control arm where it contacts the steering knuckle. The lower ball joint is located at the end of the lower control arm where it contacts the steering knuckle. There are other joints around the lower ball joint that look similar to it. Make sure that you know exactly which one it is.
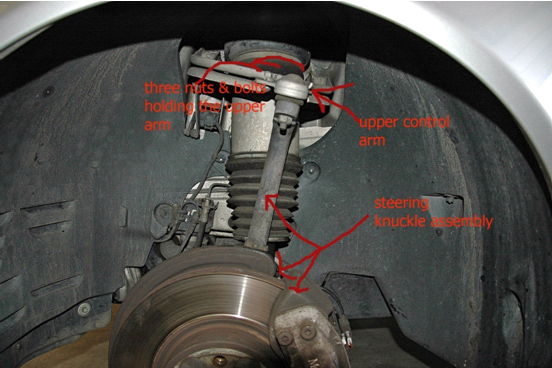
Figure 2. Upper control arm, steering knuckle, and upper ball joint. 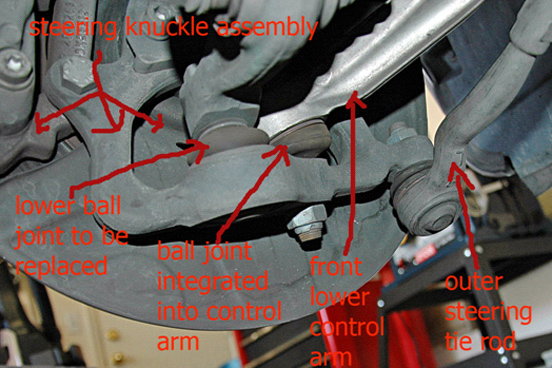
Figure 3. Lower ball joint.
Step 3 – Separate lower ball joint from lower control arm
There is a 22mm that holds the ball joint into the control arm that you will need to loosen first. After you have loosened and removed the nut, you will take the ball joint separator tool and use it to push the ball joint out of the lower control arm. This will separate it from the arm, but it will still be attached to the steering knuckle.

Step 4 – Loosen upper ball joint from upper control arm
Now that you have the lower ball joint separated from the lower control arm, you can now loosen the upper ball joint from the upper control arm. The upper ball joint is held to the upper control arm by three bolts. These bolts are T45 Torx bolts with 13mm nuts. This will completely free the steering knuckle assembly from being attached to the car, except for the brake line. You will want to secure the assembly in place with wire or zip ties to keep it from hanging on the brake line. It's very important that you don't let the weight of the assembly hang on the car's brake line. You can also place a jack or a jack stand under the assembly to help hold it up while you are working on it.

Figure 5. Loosen upper ball joint. 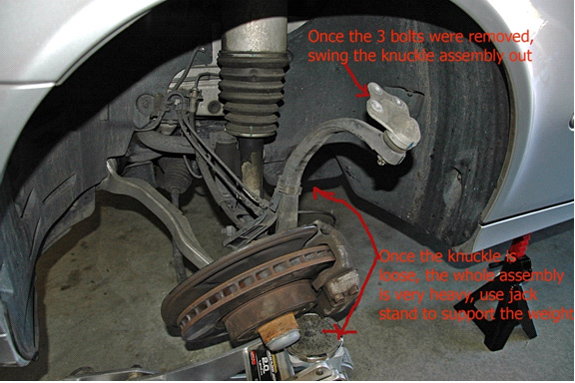
Figure 6. Support steering knuckle assembly.
Step 5 – Remove ball joints from steering knuckle
This is the part where you will need the ball joint removal and installation tool. This tool performs both steps depending on the configuration of the various pieces that come with it. There should be more detailed instructions that come with the tool that can better explain how to use it. Also, keep in mind that some tools might be slightly different than others. This tool is used to remove the lower ball joint and to remove the upper ball joint from the steering knuckle. You will use the ball joint separator tool just as you did to separate the lower ball joint from the lower control arm.
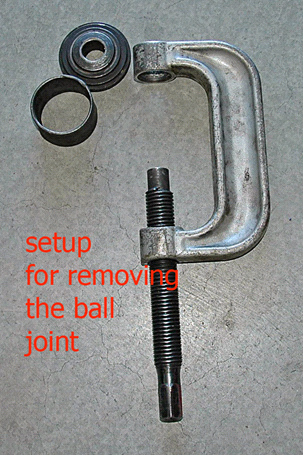
Figure 7. Ball joint removal setup. 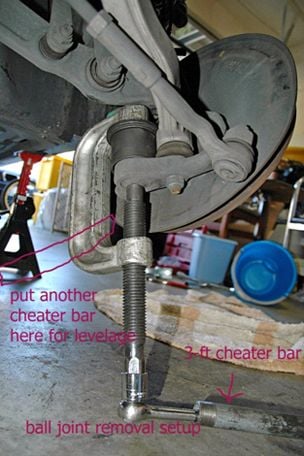
Figure 8. Remove ball joint.
Step 6 – Install new ball joints
To install the new ball joints, you will set the ball joint removal and installation tool up with the correct setup to install both upper and lower ball joints. This tool essentially works as a press to install the ball joints back into the steering knuckle.
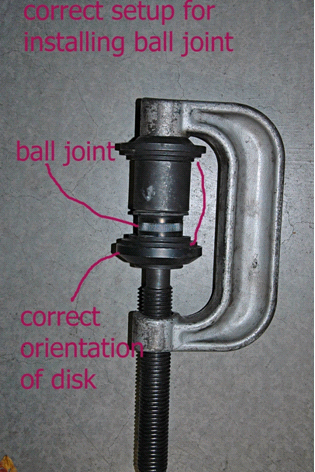
Figure 9. Setup for ball joint installation. 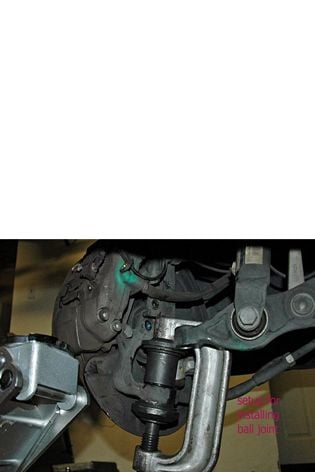
Figure 10. Install ball joint. 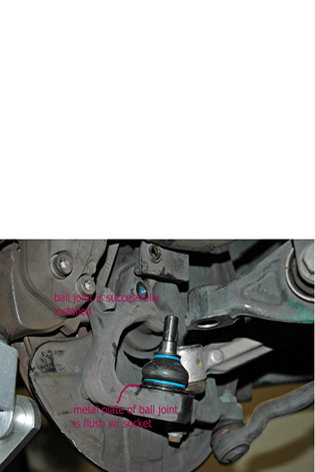
Figure 11. Successful ball joint installation.
Step 7 – Attach steering knuckle to control arms
First put the lower ball joint through the lower control arm and thread the 22mm nut onto the ball joint. Do not tighten it all the way. Then, place the upper ball joint back onto the upper control arm and tighten the three T45 bolts with the 13mm nuts. After you have tightened these, you can then finish tightening the 22mm nut on the lower ball joint. Make sure that you tighten these fasteners to factory specifications.

Figure 12. Thread lower ball joint nut. 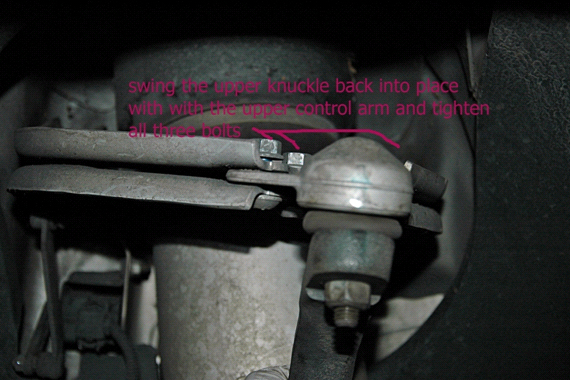
Figure 13. Tighten upper ball joint bolts. 
Figure 14. Finish tightening lower ball joint nut.
Step 8 – Finish up, test drive, align
After making sure to tighten all fasteners, place the wheel back on the vehicle and lower it to the ground. Then take the vehicle for a short test drive to see if you have fixed your issue. Finally, make sure to take your vehicle for an alignment. Any time you do suspension work, such as this, it is necessary to get the vehicle aligned afterwards. Failure to do so can cause your suspension to wear prematurely, and it will even cause the tires to wear prematurely as well as unevenly.
Related Discussions
- DIY Replace Lower Ball Joint - MBWorld.org
- Where to Buy Ball Joints and Control Arms - MBWorld.org
- Changing Ball Joints in Upper Control Arms - MBWorld.org
- Ball Joint Replacement - MBWorld.org