Mercedes-Benz E-Class: How to Replace Auxiliary Battery
Everything you need to know on how to replace the auxiliary battery in your Mercedes-Benz E-Class w212 is in this article. So continue reading.
This article applies to the Mercedes-Benz E-Class w212 (2009-Present).
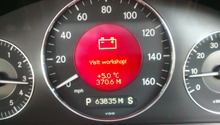
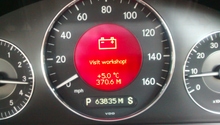
Every year, Mercedes-Benz releases a new vehicle with more and more electronically controlled features. Because of this, cars like the current E-Class use a lot of energy to maintain the car's efficiency, and keep everything seamless as well as transparent. Of course, relying only on the main battery for all electrical components is a bad idea since that could leave you stranded when it's time to start the engine. So Mercedes-Benz has incorporated an auxiliary battery to run the extra systems, leaving the main battery topped up and ready to go. Occasionally, these auxiliary batteries in your w212 go bad and need to be replaced. If the battery malfunction message has illuminated on your dash, it's time to get out the tools and do the replacement yourself.

Materials Needed
- Ratchet, extension, and metric socket set
- Phillips screwdriver
- Trim removal tool
Step 1 – Should you DIY?
Sometimes, this isn't a question of how difficult the job is or how much you'll have to pay for parts. It's mainly a question of if Mercedes will do it for you at no cost at all. With regards to your vehicle's warranty, it's a gray area with dealerships whether or not the auxiliary battery is a "wear" item or not. So first and foremost, give your local dealer a call and check if the replacement is covered. If so, don't move on to the following steps.
Step 2 – Remove the auxiliary battery
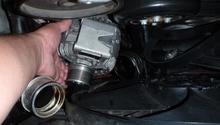
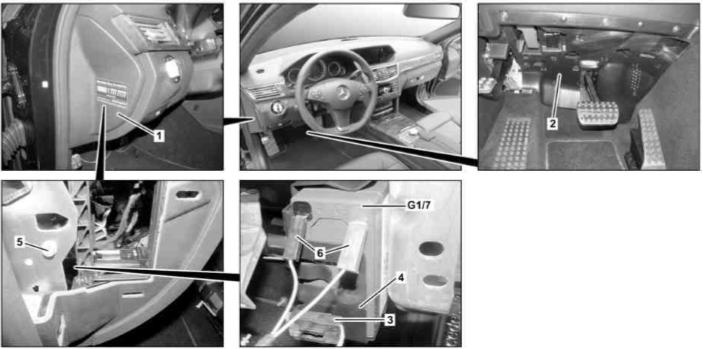
The auxiliary battery in your E-Class w212 is located behind the driver's side dashboard. Refer to Figure 2 below when performing the following the steps.
- Use a trim removal tool to pry off the fuse box access panel (1) on the side of the dash.
- Remove the Phillips screws on the lower dash panel (2), and detach it.
- With your ratchet and socket, remove one bolt (5) from the panel covering the auxiliary battery (G1/7).
- Behind the panel, unbolt the bracket (3) holding up the battery.
- Disconnect the positive and negative leads (6) from the battery.
- Remove the bolts from the additional battery bracket (4). Make sure to support the battery as it may fall inside the dash.
- Remove the auxiliary battery.
Step 3 – Install the new auxiliary battery
Install the new battery in reverse order of Step 2 above.
- Hold the battery in position, and thread the bracket bolts in by hand.
- Tighten the bolts to a snug fit.
- Reconnect the negative and positive leads of the battery.
- Bolt on the lower battery bracket.
- Reattach the lower dash.
- Snap the battery and access panels back into place.
- Turn on the ignition, and confirm that the "Battery protection: Convenience functions temporarily unavailable" indicator goes away.

Related Discussion
- 2010 E350 (W212) Aux Battery Replacement - MBWorld.org