Mercedes-Benz E-Class AMG: How to Replace Door Handle
Need to replace your Mercedes-Benz E-Class AMG door handle? Follow these easy and simple steps to replace it like a professional.
This article applies to the Mercedes-Benz E-Class AMG (2002-2009).
Sometimes the simplest components of a car can become faulty and take away from your enthusiasm. One of these simple components is your door handle. That's right, the simple part you use every day to access your car can cause some expensive troubles, unless you read on and realize how easily a Mercedes-Benz E-Class AMG door handle can be replaced. After you replace your door handle, you will have the satisfaction of being able to lock and unlock your car with ease and be back on the road knowing you saved a good chunk of change.

Materials Needed
- T20 Torx bit driver
- Needle nose pliers
- Flat head screwdriver
Step 1 – Open the door and pull back the weatherstripping
Open the door and remove the weatherstripping. This will allow you to have access to the hardware that needs to be removed so you can remove the faulty door handle.

Pro Tip
Be cautious when removing the weatherstripping as it can become brittle with age and crack if stressed.
Step 2 – Remove T20 Torx scew
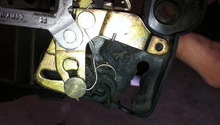
Use your T20 Torx driver to remove the screw that is accessible when the weatherstripping is removed. This will take some force initially as there is factory thread locker applied to the screw. This will unfasten the lock assembly.

Step 3 – Remove lock assembly
Now that the lock assembly is unfastened, it can be gently pried and removed from the door handle assembly.

Pro Tip
Tape your Torx screw to the door so it has no chance of falling deep into the door.
Step 4 – Remove door handle and sensor
Pry off the door handle by gently pulling towards the back and away from the car. Be careful as there is a sensor connected to the door handle that can break if the door handle is removed too abruptly. Remove the sensor by releasing it with needle nose pliers and pulling back.

Pro Tip
Be gentle when removing the door handle so you do not tear the rubber gasket surrounding the handle fixture.
Step 5 – Install new door handle
Install the new door handle by inserting it in the reverse of the removal. Be patient and make sure that any rubber gaskets are not damaged and that the "L" bracket fits correctly inside the fixture.

Pro Tip
If the door handle does not go on straight the first time, try sliding the screw in and fiddling with it to get it to seat correctly.
Step 6 – Reinstall lock for door handle
Reinstall the door lock in the same way it was removed. It should screw into place and click in. It is simple as that. Note that no programming has to be done for the new door handle, it is a simple bolt-on!

Related Discussion
- Door Handle Replacement DIY - MBWorld.org