Mercedes-Benz E-Class: How to Replace Brake Pads, Calipers, and Rotors
If you're in need of a performance brake system or a simple replacement of worn out brake components, here the proper tools and steps for you to do it yourself. So if you're about to hit the track in your w211 or hear a screeching noise every time you come to a stop, don't delay the inevitable.
This article applies to the Mercedes-Benz E-Class w211 (2002-2009).
Few parts on your Mercedes-Benz are as important as your brake components. And with a high-performance luxury vehicle like the E-Class, fast driving requires even faster braking. Outside of the tires, nothing else has a direct role between you and the car you're tailing. Take care of your brakes, maintain them, and replace them when necessary. Luckily, replacing the brakes on a w211 is as easy as replacing them on just about any other vehicle. The only unique task here is disconnecting the Sensotronic Brake Control (SBC) system before starting the job. This may seem a bit intimidating at first, but with some time and little to no mechanical skills you can complete the job in your own garage, saving you money in the process.

Materials Needed
- Hydraulic floor jack and jack stands
- Flat head screwdriver
- Lug wrench or breaker bar
- T40 Torx screwdriver
- 11 and 13mm wrench
- WD-40
- Rubber mallet
- C-clamp
- Small drill bit
- Loctite Threadlocker Blue
Step 1 – Disconnect the SBC system
Pop the hood and disconnect the negative terminal (black) of the battery. The SBC system is located in the front-right corner of the engine bay. To disconnect the SBC wire harness, use a flat head screwdriver to undo the clip near the top of the black module. Pull the wire harness connector up and away from unit to disconnect it.
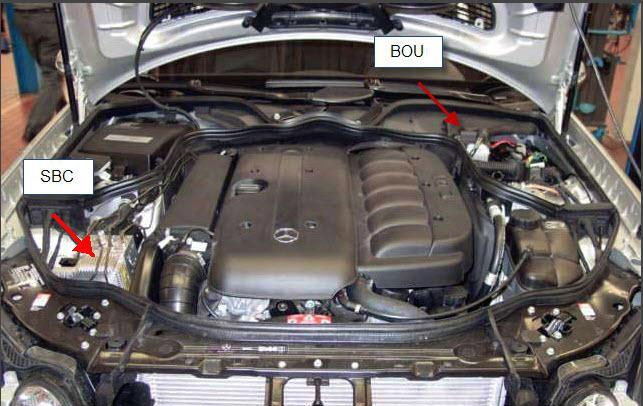
Figure 1. SBC location. 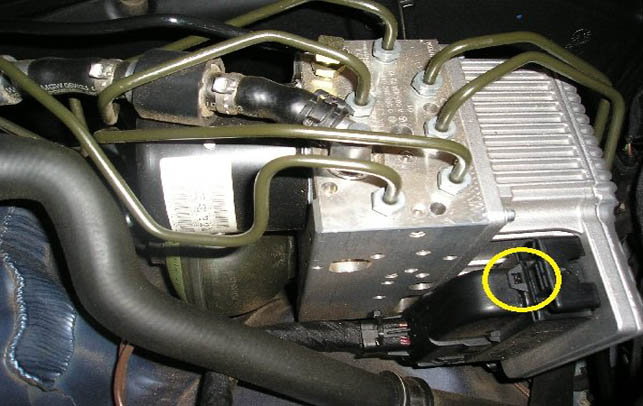
Figure 2. Lift the wire harness clip (circled in yellow).
Step 2 – Jack up the car
Use the proper lug wrench or breaker bar to loosen the lug nuts on the wheel(s) you are removing. Do not remove the lug nuts completely. Place a floor jack under the correct jacking points of the frame rail, lift the vehicle, and support it with jack stands. Remove the loosened lug nuts, and carefully pull off the wheels.

(Related Article: How to Jack Up Your Car - MBWorld.org)
Step 3 – Remove the calipers
Remove two 13mm mounting bolts from the rear side of the caliper. Pull the caliper off the caliper bracket, and support it with a hook or wire to avoid hanging it from only the brake line. Then, use a small drill bit to remove two stabilizer pins on the caliper bracket. Insert a flat head screwdriver between the brake pads and the caliper bracket. Twist the screwdriver to push it forward and apply leverage. Then, remove the brake pads.
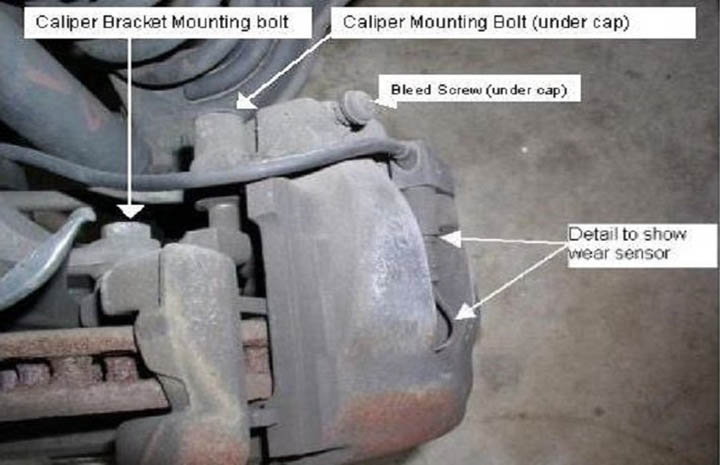
Figure 4. Location of the caliper's components. 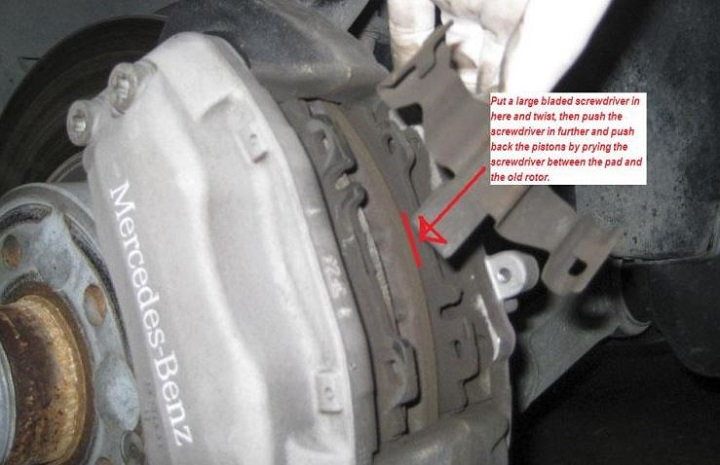
Figure 5. Apply leverage to remove the brake pads.
Step 4 – Remove the rotors
The rotor is mounted to the wheel hub assembly by a T40 Torx screw. Simply remove the Torx screw and pull off the rotor.

Pro Tip
If the rotor is rusted and difficult to remove, loosen it with a rubber mallet and WD-40.
Step 5 – Install the new calipers, rotors, and brake pads
If you are retaining the original calipers, use an 11mm wrench to hook up the bleeder line. Use a C-clamp and compress the pistons until they are flush. This will make installing the new pads much easier. To install the new rotors, apply a small amount of Loctite Threadlocker Blue to the threads of the Torx screw. Place the rotor on the wheel up, and secure it with the T40 Torx screw. When re-connecting the new calipers, apply Locktite to the mounting threads as well. Be sure to replace the wear sensor when replacing the pads if they appear to be worn. Install the new caliper bracket, and attach the new stabilizer pins. Then, insert the new brake pads, attach the new caliper, and tighten it with the mounting bolts.
Step 6 – Reconnect the SBC system
Re-install the wheels and hand tighten the lug nuts. Lower the vehicle and toque the lug nuts to 96 ft-lbs. Reconnect the SBC wire harness connector and battery. If necessary, top off the brake fluid reservoir. Then, depress the brake pedal and start the car.
Featured Video: How to Replace Brake Pads, Rotors, and Brake Sensors
Related Discussions, and Video
- Replace Front and Rear Brake Pads for E320 - MBWorld.org
- E320 Front Brake Pad Replacement - MBWorld.org
- DIY Rear Brake Job E350 - MBWorld.org
- E550 Front Brake Squealing - MBWorld.org
- E300 Front Brake Calipers and Rotors Walkthrough - YouTube.com